What is compost?
Compost is the result from decomposition of organic materials, like plants, by naturally-occuring microorganisms, primarily bacteria. These bacteria create heat through their metabolic process, which is necessary for successful decomposition. Other microorganisms (fungi and protozoans) and insects such as earthworms, centipedes, millipedes, and beetles further facilitate this process as they feed on the organic matter. All of these organisms require oxygen to survive, and in turn create carbon dioxide (CO2). The end result is a valuable dark-brown, nutrient-rich soil that is referred to as ‘black gold.’
Why is composting important?
Maybe you’re asking why you can’t just throw organic materials in the trash if it will just break down naturally through this process anyway?
Say you add a head of lettuce to a home compost pile, occasionally turning the pile to ensure the contents and microorganisms have access to oxygen. It might take about two to six weeks for the lettuce to decompose.
Take that same head of lettuce, only this time toss it in your garbage can. From there it goes into the landfill and is quickly buried by subsequent loads of trash. It no longer has access to oxygen, so the natural composting process cannot happen. The breakdown of the lettuce will be much slower. So slow, in fact, that its full decomposition can take up to 25 years.
In addition, remember how the composting microorganisms create carbon dioxide? In the landfill, different types of bacteria that can live in oxygen-depraved environments take over the decomposition process. But instead of producing CO2, the byproduct of this anaerobic process is now methane, which can hold up to 25 times more heat than carbon dioxide over a 100-year period, contributing much more to global warming in both intensity and duration. Ammonia is also released which can have negative effects on air quality, such as contributing to Salt Lake City’s winter inversions.
Organic materials also take up space in landfills; yard trimmings make up about 7% of landfill waste each year. Food waste is the single largest category of refuse in landfills, comprising about 24% of the total. It is estimated that 28% of landfill contents could be composted, and if everyone in the U.S. participated in composting, it would be the equivalent of taking 7.8 million cars off the road.
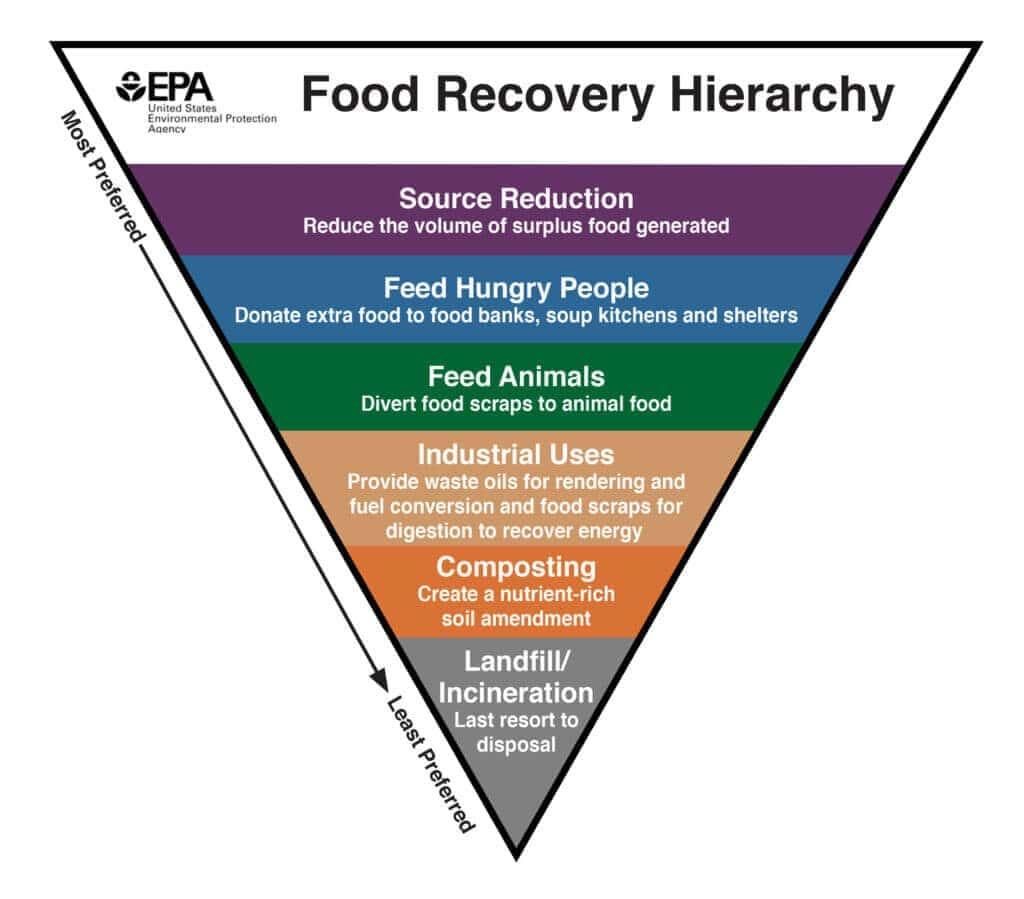
But while composting is undoubtedly very important, it is the last preferred step on the EPA Food Recovery Hierarchy before landfilling. Waste reducing strategies should be employed to prevent waste in the first place as much as possible. Learn more about reducing food waste here.
Benefits of composting
As discussed, composting has significant large scale benefits including decreasing greenhouse gas formation and reducing landfill contents.
In your own yard, compost is a valuable soil amendment that is a universal solution to nearly any soil problem. The benefits of using compost include:
- Soil structure and tilth, or suitability for cultivation, are greatly improved.
- Soil fertility. Compost contains important nutrients, making it a natural fertilizer for healthy plants. I find that maintaining adequate compost in my garden beds completely eliminates the need to fertilize in most cases.
- Soil chemistry. Compost is a great solution to help remediate saline soil as well as decrease soil pH for more acidic soil.
- Soil aeration. Compost loosens soil by increasing the air spaces necessary for deeper plant root growth. It is a great solution for compacted soils.
- Water absorption, retention, and drainage. Improved aeration enhances the soil’s ability to absorb and store water. For sandy soils, the addition of compost promotes better water retention, while drainage is improved in clay soils. Learn more about conserving water in your landscape here.
Incorporate 2 to 4 inches of organic matter throughout entire garden beds instead of just amending individual holes. This practice promotes a healthier environment for root development and plant establishment.
What you can and can’t compost
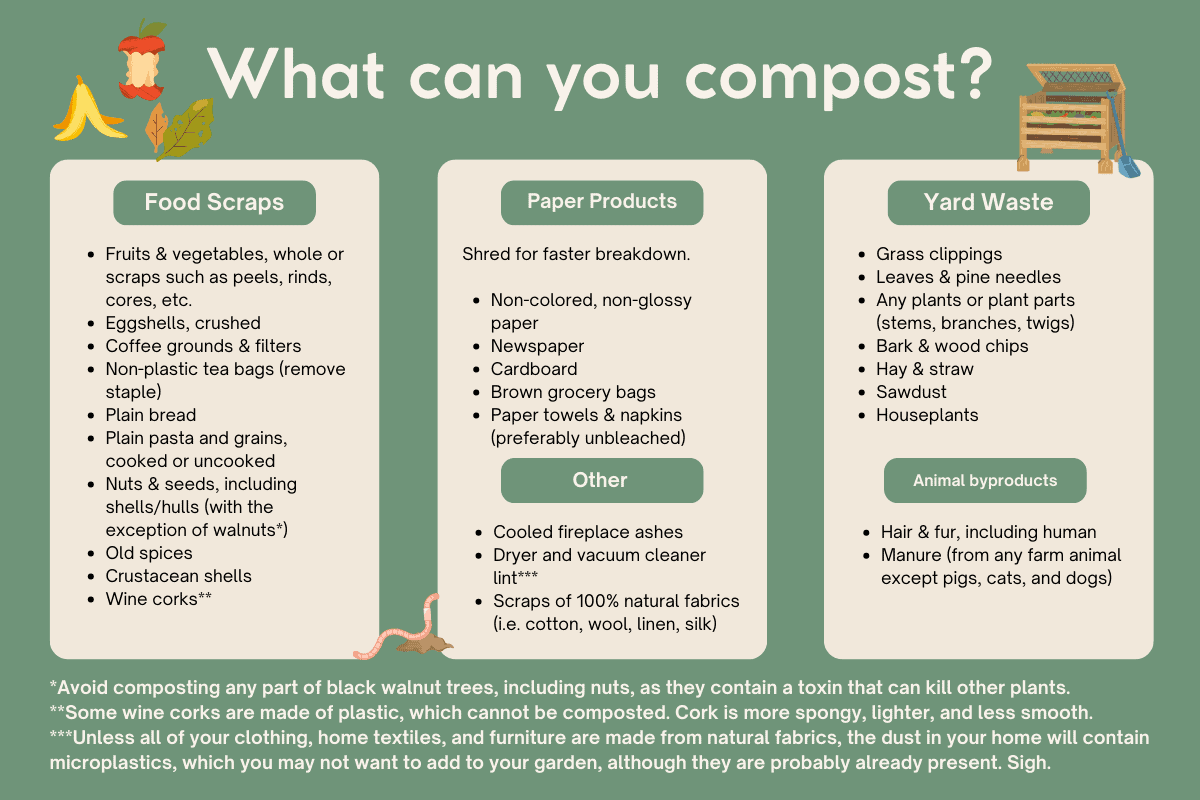
Additional notes
Many sources say that certain types of fabric can be added to your compost pile. Textiles in poor condition (stained, torn, etc.) can be composted if made from 100% natural fibers, such as cotton, wool, silk, cashmere, linen, and hemp. You may still be able to compost if the fabric contains <5% elastane. Remove non-organic decorations, lace, buttons, zippers, elastic, and labels that will not break down. Cut/shred the fabric into smaller pieces for faster breakdown.
Disclaimer: I have not personally tried composting all of the above items, but this list is derived from many resources, which I have also verified with a member of USU’s horticultural team.
Composting bioplastics
Packaging and plastic labeled “compostable” are deceptive as most require higher heat than can be achieved by backyard, or even commercial, composting. These products must be processed a commercial composting facility with capabilities to do so, which many states (including Utah) do not have. A certification like BPI Compostable helps, but make sure to check the fine print as the item will likely still require commercial processing. Make sure the label specifically states that it is suitable for home composting. TUV Austria is a common certification for these products.
Things that Cannot be Composted
Some of these materials attract pests, while others contain pathogens that are not likely to be killed as traditional composting does not reach the heat levels necessary to kill them.
- Dairy products
- Meat or fish
- Bones
- Cooked foods
- Fats, oils, or grease
- Produce stickers
- Pet (cat/dog) or human waste
- Cat litter
- Construction material/lumber
- Painted or treated wood
- Herbicide-treated plants and grass
- Diseased and pest-infested plants
- Weeds (the heat will likely not reach high enough temperatures to kill the seeds and prevent spread)
- Synthetic products like plastic
How to compost at home
There are several methods of composting, and you don’t necessarily need a yard to do it. Read on to decide which is right for you to start composting at home.
The most comprehensive, easy (and expensive) option is to purchase a countertop composter like Lomi. The advantage of a device such as this versus traditional composting is that it can process items that cannot normally be composted, like meat scraps, leftovers, and approved bioplastics. Add compost to houseplants or outdoor soil–I’m sure a park or school will do for those without yards. Or save for a gardener friend, who will be grateful for your gift.
Indoor composting
Even if you don’t have a yard or the space, you can still compost, either directly, or contributing to others that do.
Maybe you’re lucky and live in an area that has an aerobic digester, or biodigester that can compost food waste in a similar fashion but on a very large scale. These facilities essentially act as a huge stomach with similar microorganisms that digest organic wastes. Methane and other gases that result from decomposition are harnessed and converted into renewable fuel, or biogas, used for energy. The leftover solids are digestate, basically a fancy name for compost. I toured my local biodigester, and you can read all about it and the fascinating process in my blog post.
Check whether your neighborhood has a community composting site where you can drop off compostables. Lastly, if you have access to yard waste collection, make sure you add approved compostables. This may differ between municipalities or companies, but in the very least you are safe to add tea bags & coffee grounds, fruits & vegetables, and eggshells to green waste cans.
Tip: When collecting food scraps for community composting or biogestion, save in an airtight container or freeze to eliminate odors.
Vermicomposting, aka worm composting
Vermicomposting, which is composting with worms, is another option that can be done indoors; if done correctly, there shouldn’t be any bad odors, only an earthy smell if any. You can store the worms in a closet, under the kitchen sink, garage, or outdoors if you prefer and have access. The ideal temperature for them is between 60-70℉.
The main advantages of worm composting is that it doesn’t require access to a yard or the outdoors, it can be done year-round, and it is quite cheap.
To start, you need a solid container such as an old bucket or bin, with small holes drilled in the sides or lid for ventilation. The optimal container has more surface area than height. Add a thick layer of organic substrate, such as coconut coir or shredded newspaper or brown paper grocery bags. Then add a handful of soil and moisten the whole thing with just enough water to soak in but not to pool.
Next, add your worms. Note that the worms used in vermicomposting are NOT regular earthworms that you can find outside. The worms required are called red worms, or red wigglers, and they will need to be purchased at a local garden center or online. You don’t need many as they will eventually reproduce. Add a small amount of food scraps to start and then cover with another layer of the same organic matter you used for the substrate. Whenever you add more scraps, push back the dried material and then cover again.
Food scraps should be limited to vegetable and fruit material and eggshells. Avoid acidic things like tomatoes, pineapple, or citrus, and odorous foods like onions and garlic. Depending on how many worms you have, you might add food scraps about every other day or going longer like 1-2 weeks in between additions. Put scraps in a different part of the container each time to spread the worm castings, which is the material that has passed through the worm’s digestive tract. It will take about 2-3 months to generate a decent amount of vermicompost.
Besides adding vermicompost to soil, it can be used to make worm tea, a nutritious drink for your houseplants or garden. To do this you simply bundle up a few handfuls of the worm castings into a porous bag or pouch–this can be an old T-shirt, pantyhose, or cheesecloth–and steep in a 5 gallon bucket of non-chlorinated water overnight. It works best if aerated in order encourage bacterial growth (which is a good thing). This can be achieved by using a fish tank bubbler or keeping the mixture in bottle or lidded container that can be shaken occassionally. When the tea is light brown, it’s ready to go.
For more, check out the USU Vermicomposting page.
Backyard composting
There are multiple ways to collect organic materials for composting. These include barrels, bins, hoops, commercial composting systems, or simply heaping material into a compost pile. Whatever method you choose, the principals are the same.
A compost pile needs the right ratio of nitrogen and carbon; problems arise when there is too little of one and an excess of the other. The ideal ratio is somewhere between 25:1 and 30:1 carbon to nitrogen.
- Carbon (C) – these “brown” items high in carbon are dry and brown, i.e. dry leaves, twigs, straw, hay, paper products and cardboard. Note that unless woody materials are finely chipped or shredded, they may take up to two years to break down.
- Nitrogen (N) – “green” nitrogen-rich items are fresh and green, i.e. grass clippings, fruit & veggie scraps, eggshells, coffee grounds & tea bags, manure
To start a compost pile, select a spot that gets at least six hours of sun per day. The bottom layer should be a 4-6 inch depth of browns, followed by a layer of greens, and topped with another layer of brown. These layers can continue like lasagna, but always make sure there is about twice as much more brown than green. Also make sure to have the pile covered with a brown layer to decrease pestsAn ideal compost pile size is 3′ x 3′ x 3′ (one cubic yard).
The smaller materials are, the faster they will decompose; shred or grind them first. An easy way to do this is with a lawn mower. Spread a layer of leaves only an inch or two thick, mow over them while collecting in the bag so you can deposit the shredded leaves wherever you are composting.
In addition to carbon and nitrogen, a successful compost pile needs:
- Heat – The temperature in the center of the pile should reach about 140℉. The temperature will start to drop as the composting process slows, and of course when outdoor temperatures are decreasing. Compost thermometers are available for monitoring.
- Air – Aerate the pile by turning periodically with a pitchfork. This prevents overheating and provides needed oxygen for both microrganisms and insects, which encourages faster, even decomposition. Aeration is the biggest factor in decomposition speed. Turning weekly will yield the quickest results, producing compost in one to two months if all the other conditions are adequately met. Without any turning, the process can take anywhere from six months to two years.
- Moisture – Make sure contents stay damp, but not wet. Think of a damp, wrung out sponge.
When the pile is fully composted, it will be dark and crumbly with an earthy odor. As it reaches this stage, leave it undisturbed for one month to cure, allowing for any final reactions to occur and for the mixture to stabilize.
| Troubleshooting | Possible causes | Solution |
|---|---|---|
| Material not decomposing | Too dry Material size too large Materials too woody Not biodegradeable Not enough green | Add water Shred material into smaller pieces Remove woody materials or shred into fine pieces Remove non-biodegradable items Add greens |
| Pile not heating up | Too much water Too small Not enough oxygen Not enough green Cold outdoor temps | Allow pile to dry or add more dry materials Enlarge pile Turn pile Add greens Increase pile size and/or insulate pile with straw |
| Pile temperature too high | Pile is too large Lack of oxygen Low in carbon/brown | Reduce pile size Turn pile Add brown material |
| Bad odor | Not enough oxygen Excess moisture | Turn pile Add brown porous material (like sawdust) |
| Ammonia odor | Too much nitrogen/green Not enough oxygen | Add brown material Turn pile |
| Pests (i.e. rats, raccoons) | Presence of meat or fatty food scraps | Remove meat/fatty foods, cover with layer of soil or sawdust, build or purchase an animal-proof compost bin |
When amending soil with compost for the first time, add 1″ of organic matter for every 3″ of tilled soil depth, thereafter adding 1″ of compost each year to keep your soil healthy. The presence of earthworms is a great indicator of soil health.
The benefits of compost can also be applied to lawns. Top dress grass with a ¼- to ½-inch layer of compost, ideally after aeration.
If you’re more of a visual, hands-on learner, check with your local community gardens or state university extension service for composting classes. Visit the EPA or USU extension for more composting information.
Discover more ways to utilize green waste in your yard and other ways to create a sustainable garden.
Helpful Hint
Whichever method you choose, I recommend purchasing a countertop composter to collect your kitchen scraps. It’s simple to place it next to your cutting board as you prepare a meal. I had an older version of this OXO compost bin for a long time, and now I use this Simple Human Compost Caddy that hooks onto the side of my trash can. If I’m doing a lot of cooking or preserving, I’ll use a large bowl instead to collect all the cores/stems/peels, etc., and if I have a brown paper grocery bag I will use that and then toss the entire thing in my green waste can since those bags are also compostable.